Yo, if you’ve ever worked on a bathroom remodel, a basement plumbing rough-in, or that weird nook under your kitchen sink where there’s barely 6 inches of space to swing a wrench, you know how much of a pain U-PVC fittings can be. I’ve been supplying U-PVC fittings for almost 10 years now, and let me tell you, half the calls I get from plumbers, handymen, and even DIYers aren’t “what size elbow do I need?”—they’re “how the hell do I fit this thing in a space that’s smaller than my work boot?” U-PVC Fittings
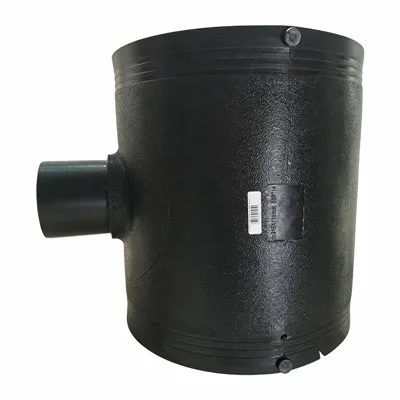
Don’t get me wrong, U-PVC is awesome for most plumbing jobs: it’s cheap, corrosion-proof, easy to cut, and way less fussy than copper or PEX. But tight spaces? That’s where even seasoned vets stumble. I’ve seen guys force a 90-degree elbow so hard they crack the socket, or try to twist a slip joint fitting with pliers and strip the O-ring. Today I’m breaking down the exact, step-by-step stuff I always tell my customers—stuff that’s actually worked, not some generic online tutorial written by someone who’s never crawled under a toilet.
First, let’s get one thing straight: prep is everything. I know, I know, everyone skips prep because they just wanna get the job done. But when you’re working in a tight spot, a 10-second mistake can turn into an hour-long headache. First off, measure twice, cut once—but not just the pipe. Grab a tape measure and map the space you’re working with. If you’re squeezing between two wall studs, or under a sink cabinet, write down the exact width and height of the clearance, plus any obstacles: drain lines, supply lines, maybe even that random nail sticking out of the stud that you missed.
Next, grab the right tools. No, your regular big pipe wrench won’t cut it. Skip the adjustable wrench that’s bigger than your hand. You need compact, tight-space tools: a mini pipe wrench (the ones that are like 8 inches long, not 18), a small coping saw or a ratchet pipe cutter (those little ones that fit in narrow gaps), a deburring tool (way better than a sharp utility knife for getting rid of pipe burrs), and—this is non-negotiable—an O-ring pick or a small flathead screwdriver for slip fittings. Also, grab some Teflon tape, a roll of plastic pipe tape (super sticky, great for holding stuff in place in zero-gravity-type spaces), and maybe a little tube of clear silicone? Wait, no, save that for later.
Wait, speaking of fittings—don’t just grab any U-PVC fitting for the job. In tight spaces, long-sweep elbows or short-sweep? Short-sweep, every time. Regular 90-degree elbows have a long, curved end that’ll bump into whatever’s next to you. Short-sweep (also called “utility” elbows) are like half the size, same angle, no bulk. And if you can, use slip joint fittings instead of solvent weld whenever possible. Solvent weld is permanent, and if you mess up alignment in a tight spot, you’re cutting the whole thing out and starting over. Slip joints let you adjust a little, twist, wiggle, and then tighten the nut down—game changer. I stock a ton of short-sweep slip joint elbows for exactly this reason; they sell like hotcakes for small plumbing jobs because everyone’s dealing with tight spaces.
Okay, let’s get to the actual steps. Let’s say you’re working under a bathroom sink where the drain line is crammed up against the cabinet wall, and the only opening is behind the P-trap. Here’s how to do it without crying.
First, dry fit everything. This is the single most important step no one talks about. Don’t even touch the solvent or the slip joint nuts yet. Take your pieces—cut to rough length, remember to leave a tiny gap, like an eighth of an inch, for O-rings or expansion—hold them up where they need to go, and move them around. Twist the elbow, test how the pipe fits. If it hits the wall, don’t just muscle it. Mark the spot where it’s catching, pull the fitting off, and trim a little more off the end of the pipe. Dry fitting takes 2 minutes, saves you 2 hours of redoing work.
Wait, how do you cut the pipe in a tight spot? A ratchet pipe cutter is way better than a saw here. The mini ratchet cutters fit into gaps as small as 3 inches, you just squeeze the handle and it spins around the pipe, cutting it clean, no messy shavings. If you don’t have one, a small coping saw works, but go slow—U-PVC can crack if you saw too fast. And after you cut it, you have to deburr the inside and outside of the pipe. Burrs are those little rough plastic bits left from cutting, and they’ll catch on O-rings, make it hard to slide the fitting on, and even leak later. I’ve seen guys skip deburring and get a call back a week later because their drain was dripping—don’t do that. Run the deburring tool around the inside edge, and sand the outside a little with fine-grit sandpaper if it’s got any rough spots.
Now, fitting it in. This is where people mess up. Don’t try to push and twist the whole fitting at once. Take one side first—say, the male end of the elbow—and thread it onto the pipe. Hold the pipe steady with one hand in the tight space, then work the elbow on with the other. If it’s not going, don’t force it. Wiggle it a little, twist it in different directions, maybe use the flathead screwdriver to nudge the edge of the socket gently. Once one side is on, adjust the angle, then line up the other end with the next pipe or fitting. If it’s a slip joint, slide the nut back first, then the O-ring, then push the pipe all the way in until it hits the stop in the socket. Then tighten the slip nut by hand first, then give it a quarter turn with the mini wrench—don’t over tighten, that strips the threads.
Wait, what if the space is so tight you can’t even hold the fitting? I’ve been there. Last year, a plumber called me in a panic because he had to replace a shut-off valve in a wall cavity that was only 4 inches wide. He couldn’t fit his hands to hold the valve and align the pipe. The trick here is to use pipe tape as a temporary holder. Cut a small piece of pipe tape, wrap it around the pipe end a few times, and stick the fitting (or the valve) to the pipe. Hold it in place for 10 seconds while the tape sticks, then let go. It won’t fall. Then you can work on getting the other side aligned. For extra tight spots, I also keep a can of expanding foam around? No, wait, no—don’t use expanding foam on fittings that need to be removed later. Pipe tape is all you need.
Another pro tip: when using solvent weld, wait a full minute after applying the cement before pushing the fitting on. A lot of people slather the cement, shove the fitting right away, and it slides crookedly. Wait 60 seconds so the cement gets tacky, then push firmly and twist a quarter turn to spread it evenly. That gives you enough time to align it perfectly even in a tight space, no mistakes. And wipe off any excess cement right away with a rag—if it dries, it’s a pain to get off, and might leave a rough spot that catches pipes later.
Wait, what about when there’s another pipe in the way? Like, you’re trying to fit a vertical pipe next to a horizontal supply line, and they cross. If you can’t re-route either pipe, use a combination fitting. Like a 90-degree elbow that’s also a tee? No, wait, a reducing elbow, or a street elbow. Street elbows have one end that’s male and one that’s female, so they sit closer to the wall. Regular elbows have two female ends that stick out more. Street elbows save you like an inch of space, which is huge when you’re working with 2 inches of clearance. I always have a stock of street elbows, short-sweep, in all common sizes, for exactly this scenario.
And let’s talk about common mistakes to avoid, because these are the ones that get guys in trouble. First, don’t force fittings. If it doesn’t want to go, you cut it wrong, or you picked the wrong fitting. I see this all the time—plumbers get frustrated, use a pipe wrench to twist an elbow, and it cracks. That’s a $10 mistake, but now you have to drain the line, cut out all the old pipe, replace it, and that’s a $100 headache. Second, don’t skip the O-ring for slip joints. Yeah, some guys just tighten the nut without the O-ring, thinking it’s fine, but that’s how you get leaks. Even a tiny O-ring is a must for any slip joint. Third, don’t ignore pipe expansion. U-PVC expands when it gets hot, like under a sink where hot water runs through it. If you fit it super tight with no room to move, it might crack. Leave that eighth of an inch gap I mentioned earlier, or use an expansion coupling if you have a long run in a tight space.
Wait, I promised this was realistic, right? Let’s throw in a real example. Last month, a DIYer named Jake bought a house that had a terrible under-sink drain. The cabinet was only 5 inches deep, so the old P-trap was crammed so tight it was leaking. He tried to replace it with regular fittings, kept cracking elbows, and called me. I told him to grab short-sweep slip joints, street elbows, the mini pipe wrench, and dry fit every piece. Here’s what he did: he measured the space, cut the drain pipe 1/8 inch longer than he thought, used a short-sweep 90-degree instead of a regular one, dry fit it first, then slid on the O-ring and slip nut, tightened it. Total time: 15 minutes, no leaks, no cracked fittings. He texted me a pic later, said he high-fived his buddy for not giving up. That’s exactly what works.
One more thing: if you’re really stuck, use a flexible U-PVC adapter? Wait, no, there’s also these little pivot fittings now, made specifically for tight spaces. They let you adjust the angle after installation, so you don’t have to get it perfect on the first try. I started carrying those a year ago, and they’ve been a game-changer for small jobs. They’re a tiny bit more expensive, but worth every penny when you’re working in a space where you can’t move a millimeter.
At the end of the day, working with U-PVC in tight spaces isn’t about having fancy tools or being a master plumber. It’s about prep, picking the right fittings, and taking your time instead of rushing. I’ve been doing this long enough to know that the fastest way is never the right way—those guys who force fittings end up calling me to replace their botch job anyway.
If you’re working on a project and you’re not sure which fitting is right for your tight space, or you need more tips specific to your job, hit me up. I don’t do generic sales pitches—just actual advice from someone who’s been in your shoes, handing out U-PVC fittings that actually work for tight spots. We can chat about what you need, no pressure, no weird hoops to jump through.

And that’s it for today. Next time you’re crawling under a sink or squeezing between studs, remember: short-sweep fittings, dry fit first, mini tools, and don’t force anything. You’ve got this.
U-PVC Fittings References:
- Plastic Pipe and Fittings Association. (2021). Installation Guidelines for U-PVC Plumbing Systems in Confined Spaces.
- Consumer Product Safety Commission. (2020). Common Mistakes in U-PVC Pipe Installation.
- International Residential Code. (2019). Plumbing Fixture Piping Clearance Requirements.
- Plumbing-Heating-Cooling Contractors Association. (2022). Tight Space Plumbing Best Practices.
Qingdao Polyfusion Machinery Co., Ltd.
As one of the most professional U-PVC fittings manufacturers and suppliers in China, we have world-leading production equipment and strong manufacturing capabilities. Please feel free to buy bulk high quality U-PVC fittings from our factory.
Address: Chengyang Industry Zone, Chengyang, Qingdao, Shandong, China
E-mail: export01@qdpolyfusion.com
WebSite: https://www.polyfusionfittings.com/
